ShopDreamUp AI ArtDreamUp


Suggested Deviants


Suggested Collections


You Might Like…


Description
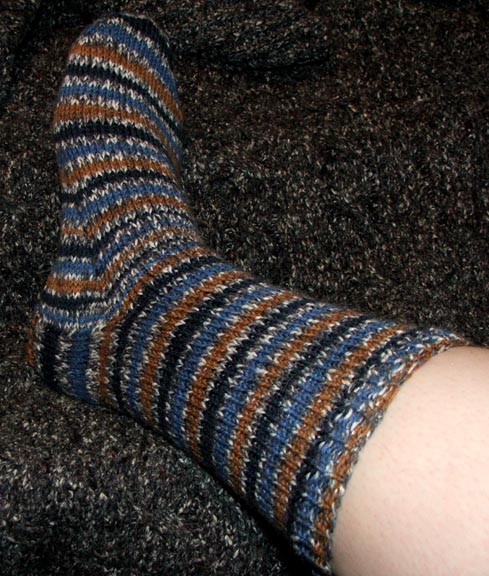
YAY!!! I DID IT!!! Thank you to everyone who helped on the yahoo kntting group Knitting For Cheap You guys are awesome!
This sock is made from LION BRAND® MAGIC STRIPES yarn using their basic sock pattern below. I LOVE this sock! I'm about half way done with the second one. I cant wait to wear them! The yarn feels nice on my feet and I love love wool socks. These will be my first pair that arent itchy! Last year when Shane and I went to Florida I wore these heavy wool socks with my sandals the whole time. Everyone thought I was crazy. But my feet sweat SO bad in my sandals with out socks, my feet slip all over and I end up with blisters.Regular cotton socks get real wet and end up feeling thin and sticky. Wool doesnt do that. It stays dry and fluffy, like you just put them on! The only thing I hated about those wool ones where that they where made from the cheapest, itchiest wool in the world! Theyre those grey and neon orange ones that wal-mart has in the camping section. Anyway, these are better! And not too hard once you get the hang of knitting with 5 needles an have some help with the 'turning of the heel' !!!!
SIZE
Adult Medium (8" measured around leg and foot)
MATERIALS
• LION BRAND Magic Stripes
1 ball #202 Sea Blue or color of your choice
• Size 3 (3.25 mm) double pointed needles (set of 5) or size to obtain gauge
• Stitch markers and holder
• Large-eyed, blunt needle
GAUGE
28 sts + 40 rows = 4” (10 cm) in St st (k every stitch in the round; k on RS, p on WS when knitting flat).
BE SURE TO CHECK YOUR GAUGE.
STITCH EXPLANATIONS
ssk (slip, slip, knit) 1. Slip the next 2 sts as if to knit, one at a time, to right needle. 2. Insert left needle into fronts of these 2 sts and k them tog.
Grafting
Holding the 2 needles parallel with wrong sides of fabric together, thread a blunt tapestry needle with one of the yarn ends and work as follows: Insert needle as if to purl into the first stitch on front piece. Insert needle as if to knit into the first stitch on the back piece. Then follow steps 1-4 as outlined below.
1) insert it as if to knit through the first st on the front needle and let the st drop from the needle.
2) Insert the needle into the second st on the front needle as if to purl and pull the yarn through, leaving the st on the needle.
3) Insert the needle into the first st on the back needle as if to purl and let it drop from the needle, then
4) insert it as if to knit through the second st on the back needle and pull the yarn through, leaving the st on the needle. Repeat 1-4 until all sts are gone. When finished, adjust tension as necessary. Weave in ends.
SOCKS
Cuff
Loosely cast on 56 sts. Divide sts evenly onto 4 double pointed needles.
Place marker and join, being careful not to twist sts.
Work in K1, P1 Rib for 1”.
Work in St st until piece measures 6" from cast on edge.
Place last 28 sts on a holder (instep sts).
Heel flap (worked back and forth on 28 heel sts only)
Row 1 *Slip 1, k 1; rep from *.
Row 2 *Slip 1, p 1; rep from *.
Repeat Rows 1 and 2 until heel flap measures 2 1/4" (28 rows), ending with Row 2.
Turn Heel
Row 1 K 17, ssk, k 1, turn.
Row 2 Slip 1, p 7, p2tog, p 1, turn.
Row 3 Slip 1, k 8, ssk, k 1, turn.
Row 4 Slip 1, p 9, p2tog, p 1, turn.
Row 5 Slip 1, k 10, ssk, k 1, turn.
Row 6 Slip 1, p 11, p2tog, p 1, turn.
Continue in this way, working 1 more st between dec until all 28 sts have been worked, ending with a wrong side row – 18 sts.
Pick up sts for heel gussets as follows: Knit 9 sts; place marker (this is now the end of rnd marker); with another needle, knit 9 sts, pick up 19 sts along edge of heel flap, place marker, (with another needle, knit 14 sts of instep) twice; place marker, with another needle, pick up 19 sts along edge of heel flap, knit rem 9 sts – 84 sts.
Gusset
Rnd 1 Knit.
Rnd 2 Knit to 3 sts before first marker, k2tog, k1, slip marker, knit to second marker, slip marker, k1, ssk, knit to end of rnd.
Repeat Rnds 1 and 2 until 56 sts remain.
Note Keep markers in place for toe shaping.
Foot
Work even in St st until foot measures 7 1/2" (or 2" less than desired total length).
Toe shaping
Rnd 1 Knit to 3 sts before first marker, k2tog, k1, slip marker, k1, ssk, knit to 3 sts before second marker, k2tog, k1, slip marker, k1, ssk, knit to end of rnd.
Rnd 2 Knit.
Repeat Rnds 1 and 2 until 20 sts remain.
Finishing
Knit across first 5 sts of rnd. 10 sts will be for the top of foot and 10 sts will be for the bottom of the foot. Graft remaining stitches together.
ABBREVIATIONS:
beg = begin(ning)
dec = decreas(e)(s)(ing)
k = knit
p = purl
rem = remain(s) (ing)
rep = repeat(s)(ing) rnd(s) = round(s)
RS = right side
st(s) = stitch(es)
St st = stockinette stitch
tog = together
WS = wrong side
Image size
489x576px 99.46 KB
Make
FUJIFILM
Model
FinePix S5100
Shutter Speed
1/64 second
Aperture
F/2.8
Focal Length
6 mm
ISO Speed
200
Date Taken
Oct 3, 2005, 1:48:22 AM
© 2005 - 2024 sej
Comments12
Join the community to add your comment. Already a deviant? Log In
Great job! I remember knitting my first pair of socks. I thought the torment would never end, but it was a great feeling when I sewed up the toe.